
Thursday, December 31, 2015
Tuesday, December 29, 2015
The Best of Little Treasures in 2015

It has become a tradition here at the Little Treasures for me to recapitulate the past year with the most attractive posts. 2015 was an extraordinary year, both personally and professionally.

I am happy and content that this year it was not all crochet on the blog; we played with clay, we embroidered necklaces, we sewed a fringe scarf, we made a bunting in a cup, flower monograms, napkin backdrops and many more. I had my first exhibit, there were a lot of features. So many good memories and filled portfolio.

The most popular posts according to my traffic generator were the following:
1. Pom - Pom Pillow (shown above).

2. The Owl Blanket - what a treasured heirloom potential in this one. Loved working every minute on it. I used the owl squares to make a bag too.

3. This Turkish Delight Cuff Pattern turned out to be quite popular and among the bestsellers in my shop.

4. The Embroidered Necklace is a head turner. I wore it constantly during the summer and cannot describe how happy I am to have it made.

5. The fringed scarf project that happens to be the loveliest last minute gift.

6. My free pattern for these beautiful little crocheted rosettes to be made into a necklace.

7. The crochet schematic pattern for the Mandala I translated into a written pattern to raise awareness of depression.

8. I loved researching and writing about oya crochet as much as you loved reading about it. My Oya necklace is already cooking.

9. The demystification of the larksfoot pattern turned out be an absolute hit.

10. And definitely the biggest winner on the blog - the post featuring free crochet skirt patterns that attracted almost 30K views!
Hope next year brings as many new ideas and inspiration as the past ones!
Read some more:
Best of 2014
Best of 2013
Best of 2012
Best of 2011
Monday, December 28, 2015
Ceramic Beads

At the end of November Eva and I visited a ceramics workshop where we worked with clay and made jewelry and beads. The process is a bit lengthy when it comes to drying because first it is left to air dry and then the clay is baked in a kiln.
After a week and a half we returned for the painting and glazing process to give the final looks to our pieces.
We worked with molds and mostly with doilies because we got seduced by the amazing, ornamented appearance the clay got.

The thing with the acrylic, glass paints is that they look pastel while you apply them on the clay, but when baked they change the color and in some cases drastically so you don't really have an idea what the final product will look like.
This picture is before baking.

After baking: Eva made this jewelry holder (plate) and the pendants below. Oh, and a bib piece she is making a necklace with shown in the picture above this (the big blue one).


These are mine. I made beads and pendants for necklaces and rings and I hope I will be able to show how I used them soon!

Wednesday, December 23, 2015
Decorating with Christmas Baubles

This year, having clothed our Christmas tree in reds and golds, we were left with many unused baubles and instead leaving them in the boxes, I used them (as centerpieces) to decorate places around the house.
For the dresser where I keep my icon I decided on a more traditional look and used red and gold baubles in combination with cones and acorns

This is more modern and it gets to decorate another corner.

The last one is reserved for the dining room table.

This is our first year to make so many centerpieces using Christmas baubles - we love how everything looks together so maybe this will turn into a nice tradition!
Tuesday, December 22, 2015
Christmas on Instagram

I immensely enjoy spending time on instagram especially now, before the holidays, browsing through images that elevate the Christmas spirit, and show joy and happiness in making things, wrapping gifts and decorating for the big day.
I feel like being in a fairy tale.


Monday, December 21, 2015
Yarn Bow Necklace DIY

Happy Monday!
There are four more days until Christmas and if you are still missing ideas for gifts I might have the perfect project for you.
To make the yarn bows necklace you need:
* (leftover) yarn,
* jump rings and a metal chain with lobster clasp as closure.
* sewing needle and thread

1-2. Wrap the yarn around your fingers - the thickness depends on the wrapping - the more strands you have - the thicker the bow. Decide on how thick you want it to be.
3. Carefully take it off and tightly wrap it several times at the center of the bow.
4. Leave a long tail, thread a needle, tie a knot and hide it in the bow. Cut off excess tail.
Make as many as you like. For my necklace I made 4 bows.


7. Attach the other bows as explained above.
8. Add jump rings and the chain at the end bows on each side. And your necklace is done.

Other ideas:
- make bobby pins
- refresh old clothes by adding bows in various ways
- decorate hats / bags
- make a bunting


HAPPY CRAFTING!
Saturday, December 19, 2015


Friday, December 18, 2015
Clay Jewels Necklace DIY
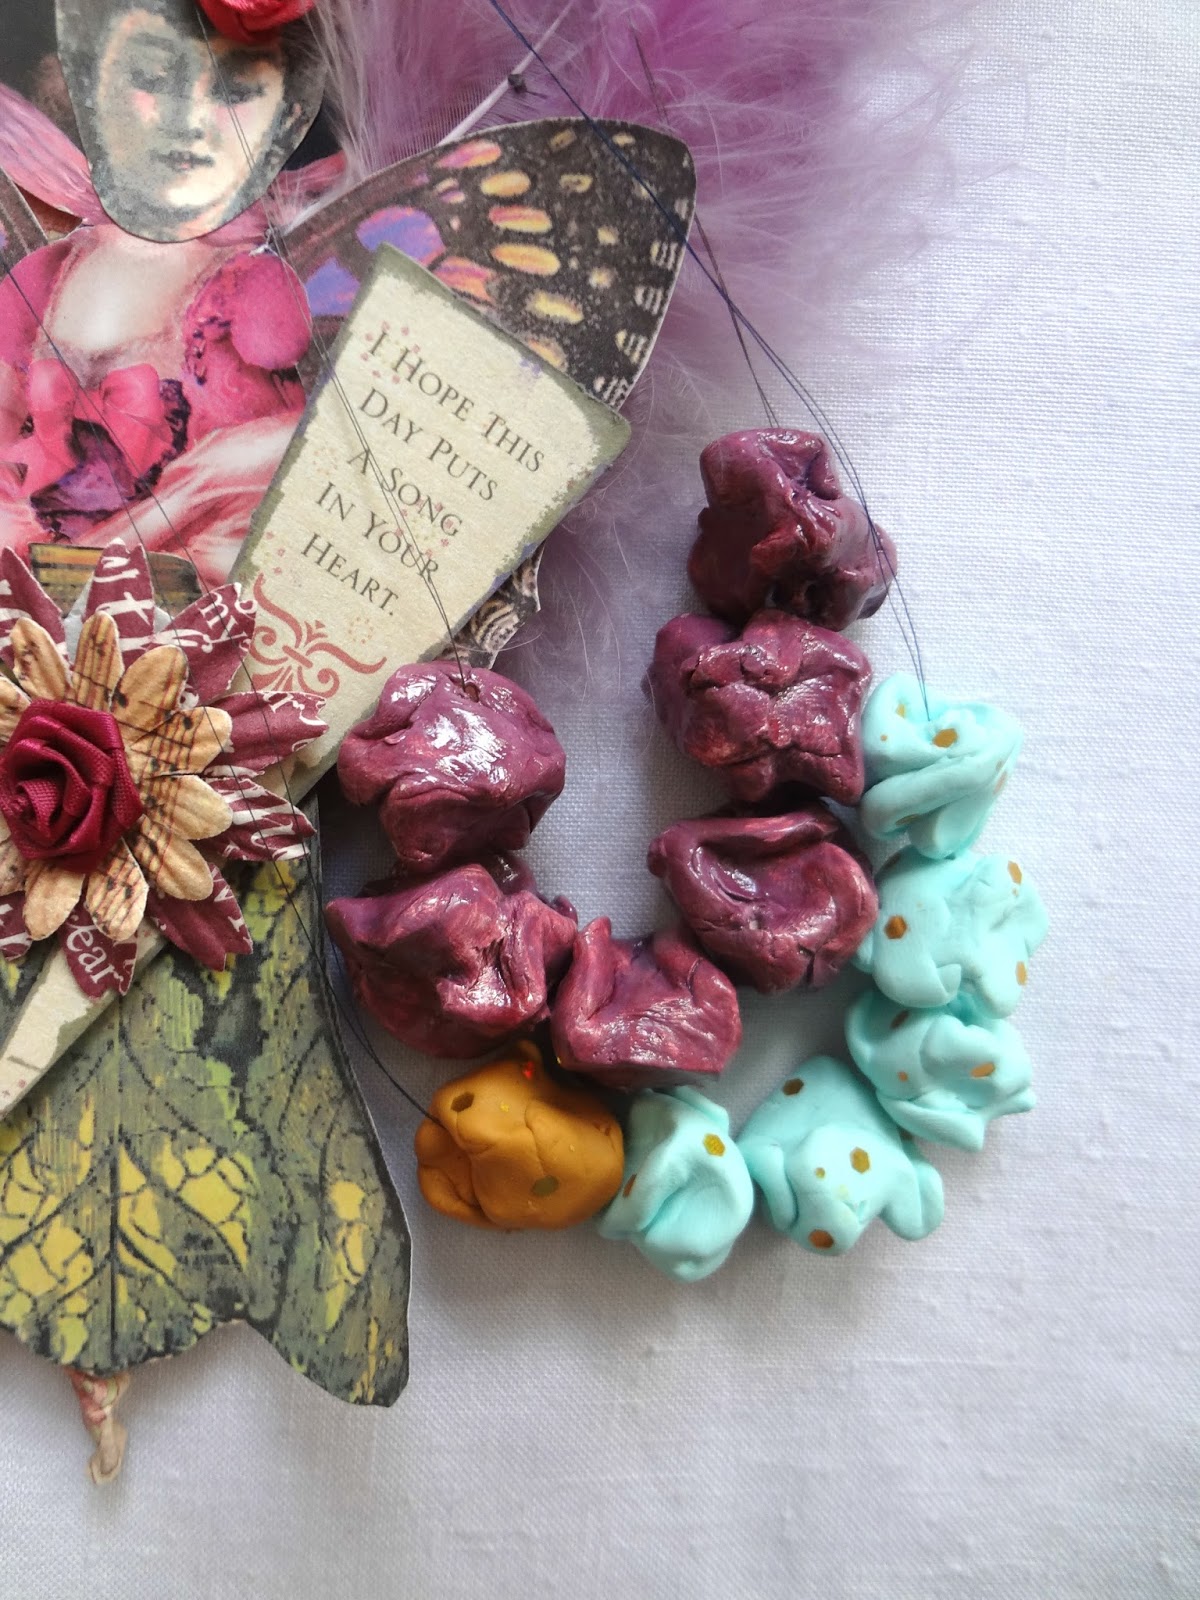

Phew! Finally Friday! And I've got the perfect weekend project for you.
I used to make a lot of clay jewelry in the past and recently got the urge to return to clay and once my favourite way of making necklaces.
I call these clay jewels. They. are. adorable.

I have never used fimo to make them, so this was a chance to try it. I made both polymer clay and ordinary clay (no bake) jewels / beads.
What you need:
1.
> Polymer / Ordinary clay
> Tempera paints (other paints maker's choice)
> Nail polish
> Toothpicks
(>sequins, seed beads)
2. Cut small chunks of clay and work to make soft. When warmed up - make a round bead and then squish it and turn it a bit to make it irregular and twisted in shape.
Mind not to make thin edges, and those will be made if you squish it right, because they will chip.

3. When done, make a hole with a toothpick, decorate the fimo ones (I added sequins) and let the others air dry (unless you have a clay that needs baking). Bake the fimo.
4. When dried, paint the beads, let dry and afterwards apply nail polish.

And that's it.
String the beads and make unique necklaces! These make lovely last minute gifts you can make for Christmas.


Thursday, December 17, 2015
Crochet Owl Bag

This is one of my finished Christmas presents. You remember the lovely Owl Blanket I made?
Well I had some grannies left from that project and planned to make a pillow, but as it happens with many other things when life happens, I chucked that project and moved on, thinking that one day I might use them. So the day has come. And I made a bag with them.
I am sure my little gift receiver will love it because she's crazy about owls.
I have these owls all around (back, front and sides) except for the bottom for which I made the grannies completely white (without any eyes, ears or beaks).


The cotton fabric I used to line it was perhaps too thin for the job, so lining it was a bit tricky.
Generally, I like how it turned out and I will surely make another but this time I want to try and make it into a small backpack, that is if time does not run out on me ... or life takes over :)

Wednesday, December 16, 2015
Bohemian Necklace Pattern Pack

There is another pattern pack in the shop. This time I gathered all Bohemians in one place.

Subscribe to:
Posts (Atom)